ANCHOR AND CHAIN SURVEY
Guide Notes for Anchors and Chains Survey
Guidance below is not linked to the extent of checking required for different periodical surveys.
Mooring equipment
Condition of the windlass foundations
Possible excessive wear on cable lifters, gears. Check clutches under operation
Condition of the prime movers:
- Steam engines (dismantled if necessary),
- Electrical motor (insulation resistance measurements),
- Hydraulic motors,
- Flexible couplings and torque limiters,
- Condition of cable stoppers, when fitted,
- Running test to verify good functioning.
Anchors
The number of anchors and links of chain cable should be checked to ensure they are in accordance with the Class Society Rules.
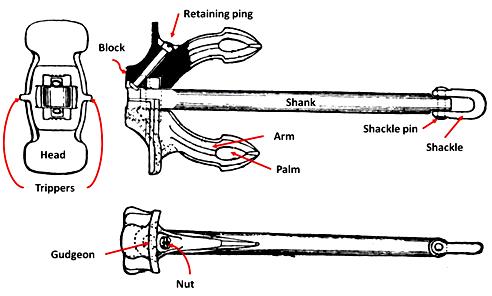
Condition of anchor pin - withdraw the anchor pin if the condition is in doubt.
Condition of anchor head holes for fitting of the
anchor pin. If anchor head holes are worn, increased diameter anchor pin
may be fitted.
Condition of shackle and hole in shank (for shackle pin).
Excessive wear in anchor shank hole or to shackle pin can be repaired by welding according to AWS and/or Class requirements.
Anchor pins or shackles should be renewed if mean diameter D1 is less than 0.88 times the original diameter.
See table below for chain cables.
Repairs by welding to the anchor may be permitted in
accordance with repair requirements in Class requirements procedure for
steel forgings or castings, to the satisfaction of the Surveyor. Bent
anchors can sometimes be straightened; the acceptance will be on a case
by case basis. Following repairs, NDE should be carried out and anchor
re- tested for major repairs as per procedures (proof loading test).
Chain cable links
Usual method of checking wear limits is to select by
visual inspection 3 worst links and calibrate them at position of most
wear (area of maximum wear):
Chain cable link renewal criteria
Link is to be renewed if D1 = 0.88D
(D being Rule diameter mentioned in the Register)
Securing by welding of loose chain link studs
Proposal for repair is to be submitted to the Surveyor including a qualified welding procedure.
Acceptance of the proposal is based on the condition of the link lo be repaired and of remaining links.
Welding is to be performed by qualified welders.
Following table outlines the conditions for weld procedure specification and qualification test:
Process
|
Rating
|
Condition
| |
Welding procedure specification
|
Welding consumables
|
Grade 3 or 3Y
|
For grade Q1 and Q2, consumables should have low hydrogen grading H15 or better.
For Q3, a very low hydrogen grading of H5 or better.
|
Preheating
|
Q1 and Q2:
100° C (min.)
Q3: 175º C (min.)
|
Applied to limit hardness and to prevent risk of cold cracks.
| |
Welding
|
Welding practice and parameter should allow large single weld deposit be made.
|
A temper bead at the stud side is allowed and may be available depending on the link grade.
| |
After welding
|
Links should be wrapped to allows a slow cooling
| ||
Welding procedure qualification test.
|
Test procedure
|
Should be representative of the actual welding conditions.
| |
Scope
|
Should include macro-section test specimen and hardness measurements.
| ||
Hardener of weld metal
|
380 Hv10 (max.)
420 Hv10 (max.)
|
For Q1 and Q2, Also Q3(in normalized and tempered conditions)
For Q3 in the quenched and tempered condition.
|
Repair procedure
The abutting surfaces of the link and stud to be
welded are to be ground to produce a good fit with an acceptable root
gap to prevent cracking. The surfaces are to be free from moisture,
grease, rust etc., just prior to welding.
NDE to check that the link is free from cracks is to be performed before welding at Surveyor satisfaction.
Welding consumables are to be dried adequately prior to welding in accordance with manufacturer’s recommendation.
In general the stud should be welded at the end
opposite to the flash butt weld of the link and it should be welded
completely around the circumference.
All weld stop-starts shall be grounded to remove any defects and to blend smoothly with the base material.
All welds are subjected to visual examination and
NDE. For Q3 chain cables, inspection is recommended to be delayed for at
least 48 hours after the weld has cooled to ambient temperature.
Studs should be located in the links centrally and at right angles to the sides of the link.


Great Post ! Interesting information is here.
ReplyDeleteThanks for your valuable post, Keep writing !
Marine chain manufacturer in China